webpack 사용방법(2) - 간단 설명
1.
npm init -y2.
npm install webpack webpack-cli --save-dev3. webpack.config.json 파일 생성
4. webpack.config.json 파일 초기 구성( + mode 속성 추가)
const path = require('path');

module.exports = {
  mode: "development",
  entry: './src/index.js',
  output: {
    path: path.resolve(__dirname, 'dist'),
    filename: 'bundle.js',
  },
};
5. 파일을 실행할 서버 플러그인 webpack-dev-server 설치
npm install webpack-dev-server --save-dev6. devSever을 실행할 위치를 설정해줌
const path = require('path');

module.exports = {
  mode: "development",
  entry: './src/index.js',
  output: {
    path: path.resolve(__dirname, 'dist'),
    filename: 'bundle.js',
  },
  devServer: {
    static: "public",
  },

};
7. 웹팩은 원래 자바스크립트만 묶을 용도로 탄생했음
8. Html도 생성하고 묶어주려면 플러그인을 설치해야됨
9. 즉 브라우저가 인식하려면 index.js말고 index.html도 있어야 됨
npm install Html-webpack-plugin --save -devhttps://webpack.kr/plugins/html-webpack-plugin/#root
10. 아래와 같이 추가해줌 html 플러그인은 아래와 같이 속성을 지정해줘야됨
const path = require("path");
const HtmlWebpackPlugin = require("html-webpack-plugin");

module.exports = {
  mode: "development",
  entry: {
    index: "./src/index.js",
  },
  output: {
    path: path.resolve(__dirname, "public"),
  },
  plugins: [
    new HtmlWebpackPlugin({
      template: "./src/index.html", //html 번들 전 파일
      filename: "./index.html", //번들 후 html
      hash: true, //모든 스크립트, css 캐시를 무효화(파일이 바뀔 때마다 화면에 반영해줌)
      showErrors: true, // 에러를 html에 보여준다.
      chunks: ["index"], // index.html에는 index.js만 넣어준다.
    }),
  ],
  devServer: {
    static: "public",
  },

};
11. package.json에 script 추가
{
  ...

  "main": "index.js",
  "scripts": {
    "build": "webpack -w",
    "start": "webpack serve --open"
  },

  ...
}
12. npm start로 실행되는지 확인
13. 이제 CSS를 반영해야됨 우리는 Sass를 쓸거니까 Sass 기준으로 설명함
14. 아래 플러그인 설치
npm install --save-dev css-loader sass sass-loadercss-loader : index.js에서 CSS파일을 불러올 수가 있음
sass: sass 설치
sass-loader : index.js에서 sass파일을 불러올 수가 있음
style-loader : 빌드할 때 <style></style>안에 생성해주는 기능을 함.
15. index.js에 아래 코드 추가
import "./src/main.scss"16. module의 rules 설정
const path = require("path");
const MiniCssExtractPlugin = require("mini-css-extract-plugin"); // css가 개발자도구에서 이상하게 등록되는 것을 없애줌
const HtmlWebpackPlugin = require("html-webpack-plugin");

module.exports = {
  entry: {
    index: "./src/index.js",
  },
  output: {
    path: path.resolve(__dirname, "public"),
  },
  plugins: [
    new HtmlWebpackPlugin({
      template: "./src/index.html", //html 번들 전 파일
      filename: "./index.html", //번들 후 html
      hash: true, //모든 스크립트, css 캐시를 무효화(파일이 바뀔 때마다 화면에 반영해줌)
      showErrors: true, // 에러를 html에 보여준다.
      chunks: ["index"], // index.html에는 index.js만 넣어준다.
    }),
  ],
  module: {
    rules: [
      {
        test: /\.s[ac]ss$/i, //루트파일에서 모든 파일 중 확장자가 sass 또는 scss로 끝나는 파일을 선택
        use: [MiniCssExtractPlugin.loader, "css-loader", "sass-loader"],
        exclude: /node_modules/, // 루트파일 중 node_modules파일은 제외하고 sass와scss를 찾는다.
      },
    ],
  },
  devServer: {
    static: "public",
  },
  devtool: "source-map",
  mode: "development",
};
17. 아래 현상을 제거하기위해 플러그인을 하나 더 설치해야함
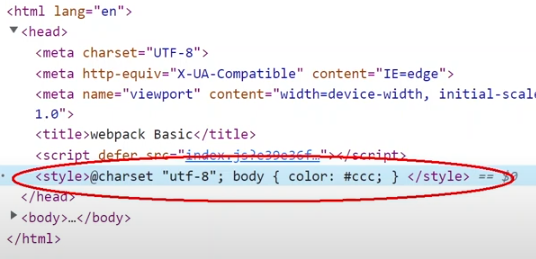
18. MiniCssExtractPlugin 플러그인 설치
https://webpack.kr/plugins/mini-css-extract-plugin/#root
npm install --save-dev mini-css-extract-plugin19. webpack.config.js 설정하기( MiniCssExtractPlugin 설정 추가)
const MiniCssExtractPlugin = require("mini-css-extract-plugin"); // css가 개발자도구에서 이상하게 등록되는 것을 없애줌

...

  plugins: [
    new MiniCssExtractPlugin({ filename: "css/main.css" }), //번들 후 css파일명

    ...

  ],
  module: {
    rules: [
      {
        test: /\.s[ac]ss$/i, //루트파일에서 모든 파일 중 확장자가 sass 또는 scss로 끝나는 파일을 선택
        use: [MiniCssExtractPlugin.loader, "css-loader", "sass-loader"],
        exclude: /node_modules/, // 루트파일 중 node_modules파일은 제외하고 sass와scss를 찾는다.
      },
    ],
  },

 ...
};
20. 선택에 따라 CleanWebpackPlugin() 설치하기
- 웹팩을 실행할 때 마다(build) dist를 청소해준다.
21. 만약 entry를 추가하고 싶다면??
https://www.youtube.com/watch?v=KZUnLhyV75s
const path = require("path");
const MiniCssExtractPlugin = require("mini-css-extract-plugin");
const HtmlWebpackPlugin = require("html-webpack-plugin");

module.exports = {
  entry: {
    index: path.join(__dirname,"src","js/index.js"),
    about: path.join(__dirname,"src","js/about.js"), //entry를 추가할 js를 추가해줌
  },
  output: {
    path: path.resolve(__dirname, "public"),
    filename : "./[name].js", // js/index.js
  },
  plugins: [
    new MiniCssExtractPlugin({ filename: "css/main.css" }),
    new HtmlWebpackPlugin({
      template: "./src/index.html", //html 번들 전 파일
      filename: "./index.html", //번들 후 html
      hash: true, //모든 스크립트, css 캐시를 무효화(파일이 바뀔 때마다 화면에 반영해줌)
      showErrors: true, // 에러를 html에 보여준다.
      chunks: ["index"], // index.html에는 index.js만 넣어준다. -> 이게 있어야 js가 겹치는 현상이 안남
    }),
    //하나 더 추가해줌
    new HtmlWebpackPlugin({
      template: "./src/about.html",
      filename: "./about.html",
      hash: true,
      showErrors: true,
      chunks: ["about"],
    }),
  ],

  ...

};
궁금한거
1. style-loader안해도 빌드가 잘되는데 왜 되는지