
Notice
Recent Posts
Recent Comments
Link
| 일 | 월 | 화 | 수 | 목 | 금 | 토 |
|---|---|---|---|---|---|---|
| 1 | 2 | 3 | 4 | 5 | ||
| 6 | 7 | 8 | 9 | 10 | 11 | 12 |
| 13 | 14 | 15 | 16 | 17 | 18 | 19 |
| 20 | 21 | 22 | 23 | 24 | 25 | 26 |
| 27 | 28 | 29 | 30 |
Tags
- 다이나믹프로그래밍
- 리액트댓글기능
- CSS
- 백준골드
- css기초
- dp알고리즘
- 프로그래머스JS
- 백준js
- 백준구현문제
- 백준
- 익스프레스
- JS
- 백준nodejs
- 알고리즘
- 포이마웹
- JS프로그래머스
- 프로그래머스
- 몽고DB
- HTML5
- 코딩테스트
- 안드로이드 스튜디오
- 코테
- 백준알고리즘
- 프로그래머스코테
- 리액트
- 리액트커뮤니티
- HTML
- 백준구현
- js코테
- 자바스크립트
Archives
- Today
- Total
개발새발 로그
안드로이드 스튜디오- 뷰 컨테이너 본문
오늘은 뷰 컨테이너의 종류들을 알아보겠습니다.
스크롤 뷰(ScrollView)
- 수직(위아래)으로 스크롤하는 기능
- 수평(좌우)으로 스크롤하는 수평 스크롤 뷰(HorizontalScrollView)는 따로 있음
- 주의 : 스크롤 뷰에는 단 하나의 위젯만 넣을 수 있음
<?xml version="1.0" encoding="utf-8"?>
<ScrollView xmlns:android="http://schemas.android.com/apk/res/android"
    xmlns:app="http://schemas.android.com/apk/res-auto"
    xmlns:tools="http://schemas.android.com/tools"
    android:layout_width="match_parent"
    android:layout_height="match_parent"
    tools:context=".MainActivity">
    <LinearLayout
        android:layout_width="match_parent"
        android:layout_height="match_parent"
        android:orientation="vertical">
        <Button
            android:layout_width="match_parent"
            android:layout_height="100dp"
            android:text="버튼1"/>

        <Button
            android:layout_width="match_parent"
            android:layout_height="100dp"
            android:text="버튼2"/>
        <Button
            android:layout_width="match_parent"
            android:layout_height="100dp"
            android:text="버튼3"/>
        <Button
            android:layout_width="match_parent"
            android:layout_height="100dp"
            android:text="버튼4"/>
        <Button
            android:layout_width="match_parent"
            android:layout_height="100dp"
            android:text="버튼5"/>
        <Button
            android:layout_width="match_parent"
            android:layout_height="100dp"
            android:text="버튼6"/>
        <Button
            android:layout_width="match_parent"
            android:layout_height="100dp"
            android:text="버튼7"/>
        <Button
            android:layout_width="match_parent"
            android:layout_height="100dp"
            android:text="버튼8"/>
        <Button
            android:layout_width="match_parent"
            android:layout_height="100dp"
            android:text="버튼9"/>

    </LinearLayout>


</ScrollView>
슬라이딩 드로어(SlidingDrawer)
- 위젯들을 서랍처럼 열어서 보여주거나 닫아서 감춤
규칙
- 슬라이딩 드로어의 handle 이름과 슬라이딩 드로어의 손잡이 역할을 하는 버튼 id가 동일해야 함
- 슬라이딩 드로어의 content 이름과 리니어 레이아웃의 id가 동일해야 함
<?xml version="1.0" encoding="utf-8"?>
<LinearLayout xmlns:android="http://schemas.android.com/apk/res/android"
    xmlns:app="http://schemas.android.com/apk/res-auto"
    xmlns:tools="http://schemas.android.com/tools"
    android:layout_width="match_parent"
    android:layout_height="match_parent"
    tools:context=".MainActivity"
    android:orientation="vertical">

    <TextView
        android:layout_width="wrap_content"
        android:layout_height="wrap_content"
        android:text="여기는 서랍 밖입니다."
        android:textSize="30dp"/>

    <SlidingDrawer
        android:layout_width="match_parent"
        android:layout_height="match_parent"
        android:content="@+id/content"
        android:handle="@+id/handle">

        <Button
            android:id="@+id/handle"
            android:layout_width="wrap_content"
            android:layout_height="wrap_content"
            android:text="서랍 손잡이" />

        <LinearLayout
            android:id="@+id/content"
            android:layout_width="match_parent"
            android:layout_height="match_parent"
            android:background="#FF00FF"
            android:gravity="center">

            <TextView
                android:layout_width="wrap_content"
                android:layout_height="wrap_content"
                android:text="여기는 서랍 안입니다."
                android:textSize="30dp"
                />

        </LinearLayout>
    </SlidingDrawer>

</LinearLayout>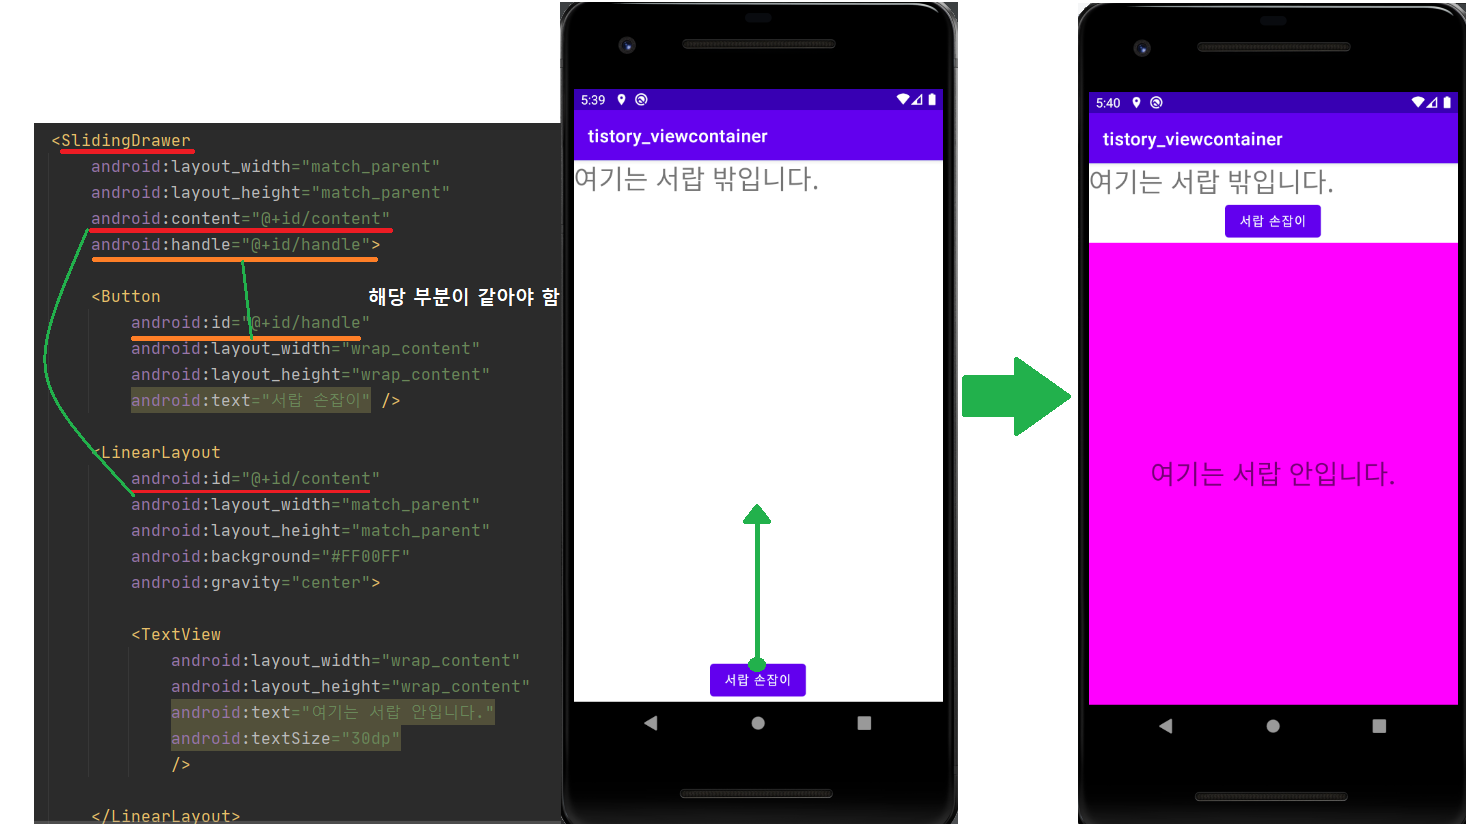
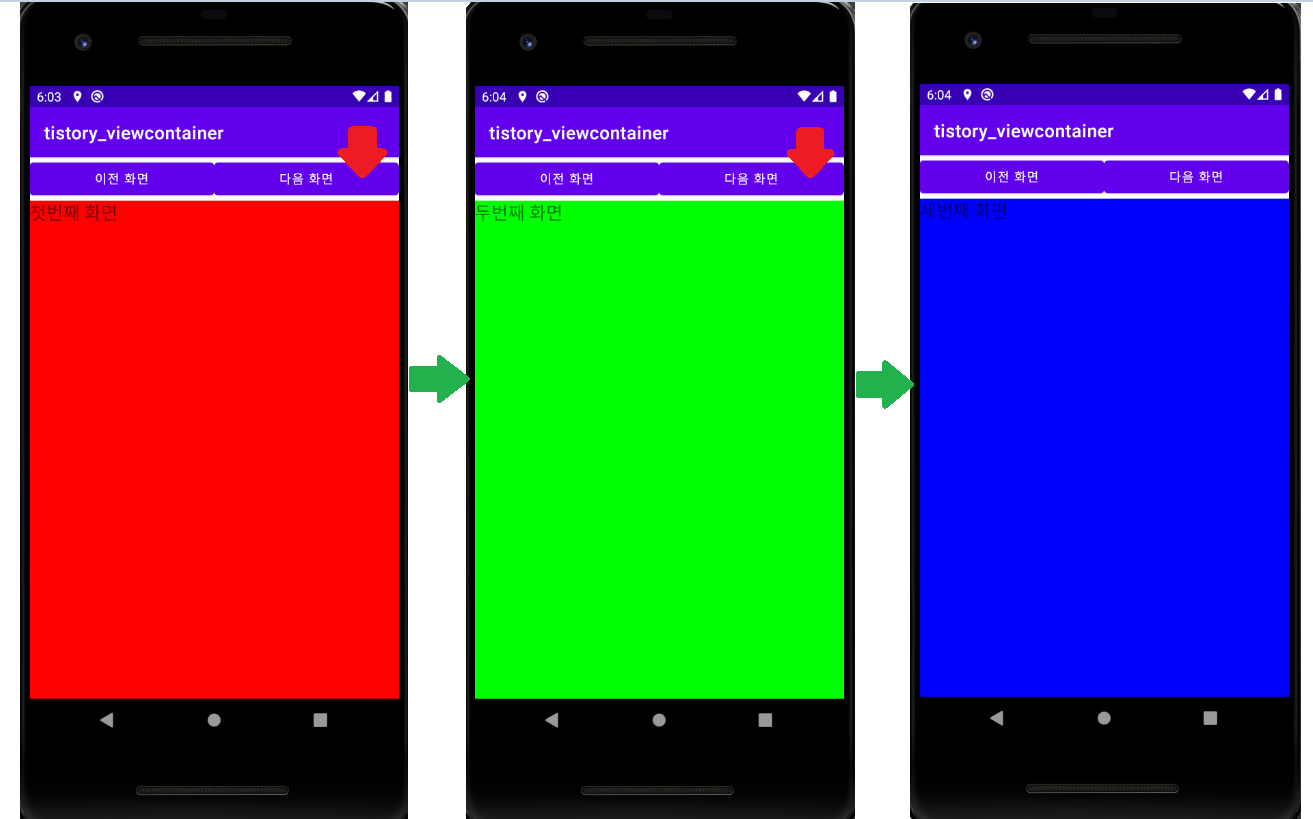
뷰 플리퍼(ViewFlipper)
- 안에 여러 개의 위젯을 배치한 후, 필요에 따라서 화면을 왼쪽과 오른쪽으로 밀어서 하나의 위젯씩 화면에 보여주는 방식의 뷰 컨테이너
<?xml version="1.0" encoding="utf-8"?>
<LinearLayout xmlns:android="http://schemas.android.com/apk/res/android"
    xmlns:app="http://schemas.android.com/apk/res-auto"
    xmlns:tools="http://schemas.android.com/tools"
    android:layout_width="match_parent"
    android:layout_height="match_parent"
    tools:context=".MainActivity"
    android:orientation="vertical">

    <LinearLayout
        android:layout_width="match_parent"
        android:layout_height="wrap_content"
        android:orientation="horizontal">
        <Button
            android:id="@+id/btnPrev"
            android:layout_width="match_parent"
            android:layout_height="wrap_content"
            android:layout_weight="1"
            android:text="이전 화면"
            />
        <Button
            android:id="@+id/btnNext"
            android:layout_width="match_parent"
            android:layout_height="wrap_content"
            android:layout_weight="1"
            android:text="다음 화면"
            />
    </LinearLayout>
    <ViewFlipper
        android:layout_width="match_parent"
        android:layout_height="match_parent"
        android:id="@+id/viewFlipper1">
        <LinearLayout
            android:layout_width="match_parent"
            android:layout_height="match_parent"
            android:background="#FF0000"
            android:orientation="vertical">
            <TextView
                android:layout_width="wrap_content"
                android:layout_height="wrap_content"
                android:text="첫번째 화면"
                android:textSize="20dp"/>
        </LinearLayout>
        <LinearLayout
            android:layout_width="match_parent"
            android:layout_height="match_parent"
            android:background="#00FF00"
            android:orientation="vertical">
            <TextView
                android:layout_width="wrap_content"
                android:layout_height="wrap_content"
                android:text="두번째 화면"
                android:textSize="20dp"/>
        </LinearLayout>
        <LinearLayout
            android:layout_width="match_parent"
            android:layout_height="match_parent"
            android:background="#0000FF"
            android:orientation="vertical">
            <TextView
                android:layout_width="wrap_content"
                android:layout_height="wrap_content"
                android:text="세번째 화면"
                android:textSize="20dp"/>
        </LinearLayout>
    </ViewFlipper>

</LinearLayout>
package org.techtown.tistory_viewcontainer;
import androidx.appcompat.app.AppCompatActivity;
import android.os.Bundle;
import android.view.View;
import android.widget.Button;
import android.widget.ViewFlipper;
public class MainActivity extends AppCompatActivity {
@Override
protected void onCreate(Bundle savedInstanceState) {
super.onCreate(savedInstanceState);
setContentView(R.layout.activity_main);
Button btnPrev,btnNext;
final ViewFlipper vFlipper;
btnPrev=(Button)findViewById(R.id.btnPrev);
btnNext=(Button)findViewById(R.id.btnNext);
vFlipper=(ViewFlipper)findViewById(R.id.viewFlipper1);
btnPrev.setOnClickListener(new View.OnClickListener() {
@Override
public void onClick(View view) {
vFlipper.showPrevious();
}
});
btnNext.setOnClickListener(new View.OnClickListener() {
@Override
public void onClick(View view) {
vFlipper.showNext();
}
});
}
}
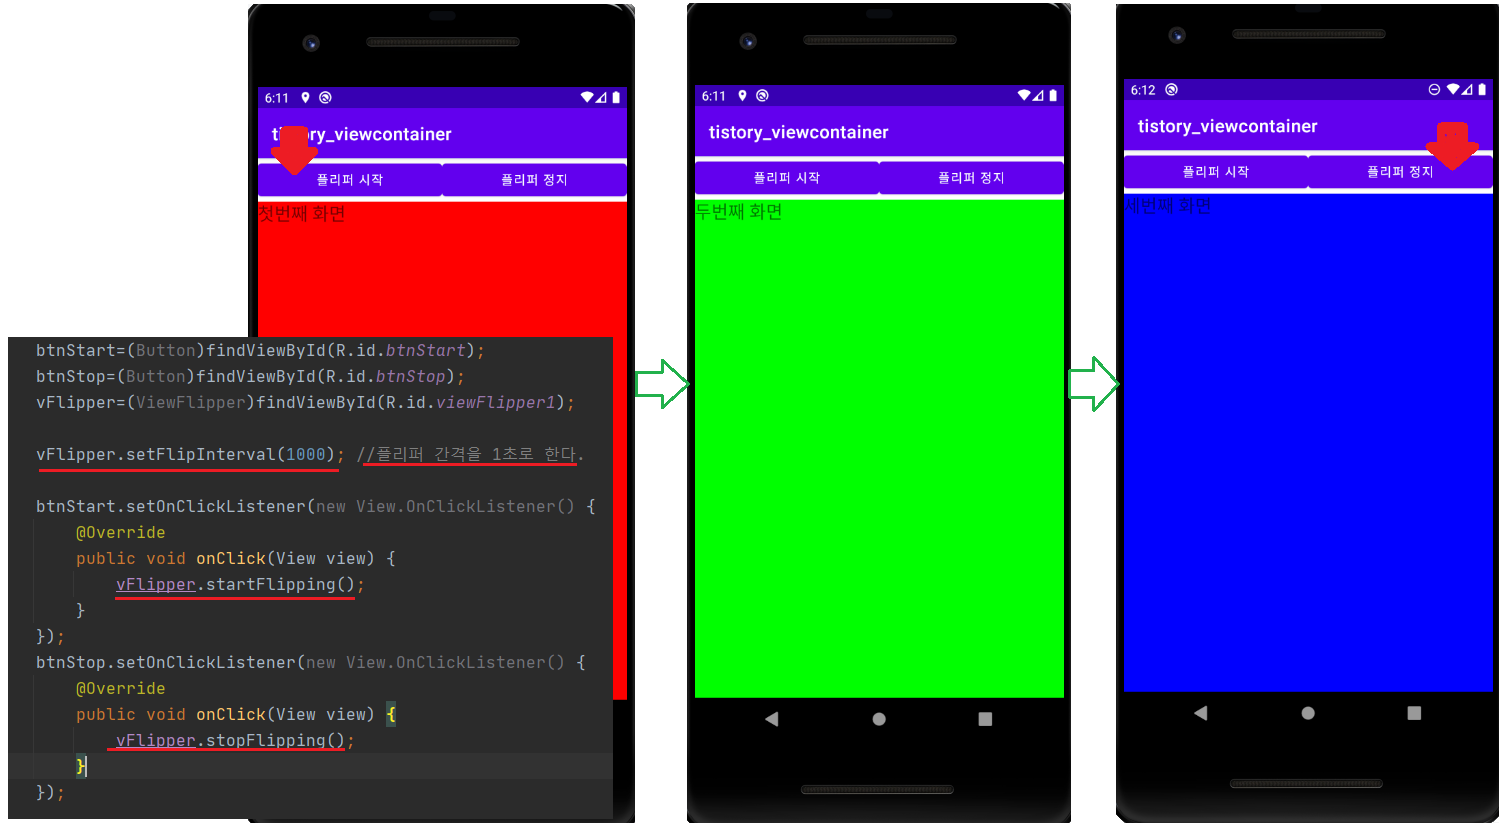
플리퍼 자동 넘기기
- 위 코드에서 사진에 나온 부분만 바꾸면 됩니다.
728x90
반응형
LIST
'안드로이드' 카테고리의 다른 글
| 안드로이드 스튜디오 -서비스 (0) | 2022.05.26 |
|---|---|
| 안드로이드 스튜디오-오류 (0) | 2022.05.20 |
| 안드로이드 스튜디오 고급위젯 간단하게 다루기 - 날짜/시간 예약 앱 만들기 (0) | 2022.05.20 |
| 안드로이드 스튜디오 고급위젯 간단하게 다루기 (0) | 2022.05.20 |
| 안드로이드 스튜디오-그리드 레이아웃으로 간이 계산기 만들기 (0) | 2022.05.17 |
'안드로이드' Related Articles
more


